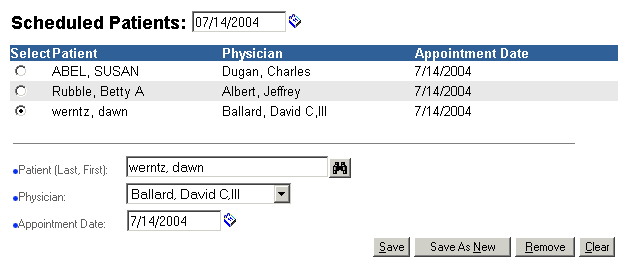
Scheduled Patients allows users to view the list of patients that have appointments for a specific day.
From this screen users can also create, modify and delete appointments.
If the screen is empty, without any patient names, that means no patients have been scheduled for the specified date.
To View Scheduled Appointments
By default, this screen displays all the patients that are scheduled for the current day.
To view a list of patients for a different date:
Enter the new date in Scheduled Patients and press the Enter key, or use the Calendar icon to find a date. The list is refreshed to show all the appointments scheduled for the new date.
The following sections explain how to:
Users can create appointments for today's date or for a future date. To create a new appointment:
On the Patient field, enter a patient's Last name or Last and First name and then press the Enter key, or click the search icon to find a patient. This field supports the use of wild characters.
Select a Physician form the drop down list.
If you are scheduling an appointment for today's date, leave the Appointment Date as is, otherwise, enter a future appointment date or use the calendar icon to select a date.
Click Save as New. The new appointment is added to the list.
Note: If the dates on Scheduled Patients and Appointment Date are different, you will not be able to view the newly created appointment. To view the new appointment, enter the appointment date in the Scheduled Patients field and press the Enter key.
The following illustration shows a list of scheduled patients:

To modify an existing appointment:
If the appointment is not on today's list, enter the appointment date in the Scheduled Patients field and press Enter to view the record you wish to modify.
Select the record you wish to modify (by clicking on the radio button next to it). The record contents populate Patient, Physician and Appointment Date.
Modify data as needed.
Click Save to save the changes. The appointment list is refreshed to reflect the change.
To delete an existing appointment:
If the appointment is not on today's list enter the appointment date in the Scheduled Patients field to view the record you wish to modify.
Select the record you wish to delete (by clicking on the radio button next to it). The record contents populate Patient, Physician and Appointment Date.
Click Delete to delete the appointment. A delete confirmation window appears.
Click OK to remove the appointment from the list.
Click Cancel to cancel the operation and keep the appointment.
The following table describes the contents of the Scheduled Patients screen:
|
Field/Button |
Description |
|
Scheduled Patients |
Date field. The default value is today's date. To view a list of patients for a different date, the user enters the new date and presses the Enter key, or clicks the calendar icon to select a future date. Changing this date refreshes the list of patients. |
|
Patient |
Allows users to search for a patient, by entering a name using either Last name or Last and First name and then pressing the Enter key, or by clicking the search icon, which takes the user to the Patient Search screen. This field supports the use of wild characters. |
|
Physician |
This is a drop-down list of all the physicians the user can choose from. |
|
Appointment Date |
Defaults to today’s date for new appointments. An appointment cannot be created for a date earlier than today’s date. |
|
Save |
Saves the changes made to an appointment. Clicking this button refreshes the list. This button is enabled when an appointment is selected. |
|
Save as New |
Saves a newly scheduled appointment. |
|
Remove |
Deletes the selected appointment from the list. Clicking this button refreshes the list. |
|
Clear |
Clears any selected radio buttons. |
| [ Previous Topic] [Next Topic] [Print Topic] | [ Top] [Back] |