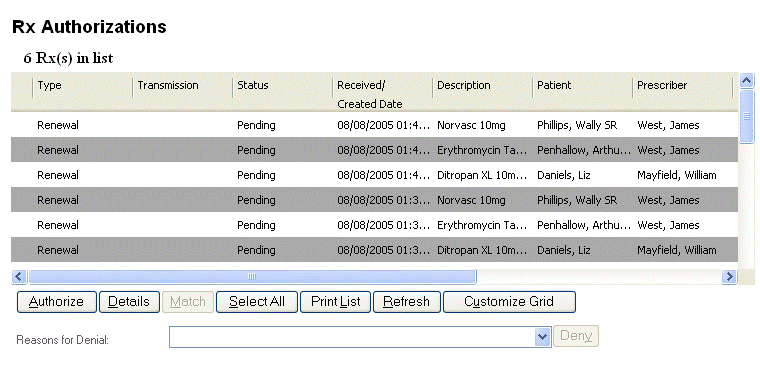
The Rx Authorizations screen allows users to view and manage all the pending prescriptions in a location. The list may include pending prescriptions for multiple patients.

The items on the Rx Authorizations list display based on a userís permission. Only those prescriptions that the user can approve appear on the list.
Users can select multiple rows and sort by column. Scroll bars appear (if needed) automatically.
Highlighting a row or a set of rows enables the buttons below the list.
The Match button is enabled when the user selects one or more unmatched prescriptions, (those having a 'No' value on the Match column)
The Deny button is enabled when a value is selected on "Reasons for Denial".
Double clicking on a row has the same effect as selecting an item and clicking the Details button. It invokes the Rx Authorization Details screen for the selected item.
Note: When a new Rx is issued to hold via print, it appears in the Rx authorizations list with a printer icon next to it.
For a detailed description of these buttons click here.
The following table describes the columns of the Rx Authorizations grid:
|
Column |
Description |
|
Type |
This column indicates the prescription type: New or Refill. |
|
Transmittal |
This column indicates the transmission status of the pending prescription. Possible values are: Error, Transmitted, Pending and Local (for printed prescriptions that are not sent electronically). |
|
Status |
This column displays the prescription status: Pending or Authorized. |
|
Date |
This is the date when the prescription was issued. |
|
Description |
This is the name of the prescribed drug. |
|
Patient |
This is the patient for whom the Rx is prescribed. |
|
Prescriber |
This is the physician who issued the prescription. |
|
SIG |
This is the SIG code for the prescription. |
|
Qty |
This is the number of units dispensed. |
|
Match |
This column indicates whether or not the prescription refill request has been matched to a patient. |
|
Refills |
This is the number of refills on the selected prescription. |
The following table describes the buttons on the Rx Authorizations screen.
|
Field/Button |
Description |
|
Authorize |
This button is used to authorize a prescription. Clicking this button refreshes the contents of the list. This button is enabled once a user highlights a row or a set of rows. |
|
Details |
Clicking this button invokes the Authorization Details screen. This button is enabled once a user highlights a row or a set of rows. |
|
Match |
The Match button is enabled when a user highlights a prescription that is not matched to a patient. This is indicated by a "No" value on the Match column. Typically, these are prescriptions that originate from another source (outside of Clinician). After matching a prescription with a patient, the prescription is added to the patient's Rx History. Clicking this button invokes the Match Drug to Patient workflow. If the selected Rx is already matched to a patient, then the Match button is disabled. |
|
Select All |
Selects all the rows on the list. |
|
Print List |
Prints the contents of the Rx Authorizations Pending List. |
|
Refresh |
This button refreshes the contents of the grid. |
|
Customize Grid
|
This button invokes a pop up window that allows users to specify what columns to include on the grid. After making changes to the grid it may be necessary to click Refresh in order to view the changes. |
|
Reasons for Denial |
This list contains a list of reasons for denying a prescription. |
|
Deny |
The Deny button is enabled when the user selects a value from "Reasons for Denial". Clicking this button denies approval of the selected prescriptions. When a user clicks the Deny button a dialog confirmation box appears.
If the user answers Yes, the selected prescriptions are denied and removed from the list. Selecting No cancels the operation. |
| [ Previous Topic] [Next Topic] [Print Topic] | [ Top] [Back] |