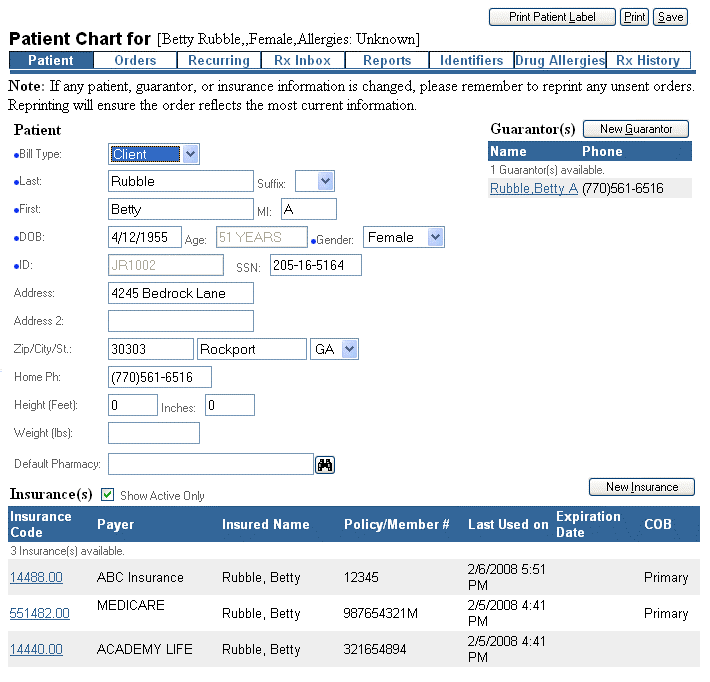
When you select an existing patient record, or when creating a new patient record, the Patient Chart window appears as shown in the following illustration:

The Patient tab is used to store an maintain the patient's demographic data, including insurance and guarantor information. The remaining tabs are described below:
|
Tab Name |
Function |
|
Orders |
Store and maintain all orders created through Clinician for the patient. |
|
Recurring |
Store and maintain all recurring orders created through Clinician for the patient. |
|
Rx Inbox |
Store and manage all the prescriptions pending approval for the patient. |
|
Reports |
Store and maintain all lab test results sent to Clinician for the patient. |
|
Identifiers |
Store and maintain identifiers linked to the patient. |
|
Drug Allergies |
Store and maintain allergy information for the patient. |
|
Rx History |
Store the patient's Rx History and manage his/her prescriptions. |
The buttons on the patient chart's upper right corner allow users to print patient labels, print the patient record, save any changes or delete the patient record.

Patient labels are used for sending specimens to labs. To print patient labels, you must have a label printer attached to your workstation.
To update patient demographic information make the desired changes and click the Save button.
If you make any changes to a patient's record, the next time you create an order or a prescription for the patient, the updated patient data will populate the order and prescription.
The following table describes the Rx related fields and buttons on the Patient screen:
|
Fields / Buttons |
Description |
|
Height / Inches |
This is the patient's height (Feet, inches). The field only accepts numeric characters. Optional field. |
|
Weight |
This is the patient's weight in pounds. The field only accepts numeric characters. Optional field. |
|
Default Pharmacy |
This field contains the last known Pharmacy saved with
the patient. This is an editable field, which supports searches, either
by entering text and pressing the Enter
key or by clicking the search icon next to the field. Clicking
the search icon |
|
Continue to Rx Pad |
Note: This button only appears when the user creates a new prescription for a new patient (i.e., when the user accesses the Patient Chart from the Rx menu). Continue to Rx Pad takes the user back to the New Rx Pad screen.
If the user is creating a new patient record from another Clinician menu, (when a user enters the Patient Chart from either the Orders or Patient menus ) then the buttons will look as shown below:
|
A guarantor is the person ultimately responsible for payment of a patient's medical bill(s). If the insurance company does not cover medical expenses, the guarantor, which is usually the patient or the patient's guardian, is responsible for payment. A patient may have one or more guarantors.

To create a new guarantor record click the New Guarantor button. A blank Guarantor window appears. Use this window to enter guarantor information for the patient. When finished click Save to save your changes.
To modify existing guarantor information, click on the hyper-linked guarantor record you want to modify. When the Guarantor window appears, modify the guarantor information for the patient. When finished, click Save to save your changes.
The bottom portion of the Patient tab displays the patient's insurance information.

When the checkbox labeled - Show Active Only is checked, as shown on the previous illustration, only effective insurance policies display. When unchecked, all insurance policies including those that have expired or are not effective are displayed. The default state for this box is checked.
If you view the Insurance Details screen for a patient you will notice effective and expiration dates. If the current date falls outside either date, when the Show Active Only checkbox is selected that insurance will not display. The insurance list refreshes every time you check or uncheck the box.
To add new insurance information click the New Insurance button. A blank Insurance window appears. Use this window to enter insurance information for the patient. When finished click Save to save your changes.
To modify existing insurance information, click on the hyper-linked insurance code you want to modify. When the Insurance window appears, modify the insurance information for the patient. When finished, click Save to save your changes.
| [ Previous Topic] [Next Topic] [Print Topic] | [ Top] [Back] |